Kids Name Art Ideas: Name Snowflakes
When I first had the crazy idea to make these Name Art Snowflakes I honestly wasn’t sure how it would go! However once we started, Immy and I found it to be one very addictive name art idea!
Once both of our names were done Immy insisted we work on making a collection – with one for each of her school friends too! 
I just love how individual they are.
I also love that combine art with math with a good dose of fine motor skill for good measure! Immy is in grade 2 and the drawing of the names was challenging for her, though the folding and cutting were no problem at all when we were working one on one. As a result, if you were planning on trying this with a whole class of kids I think I would stick to fourth or fifth grade and up. 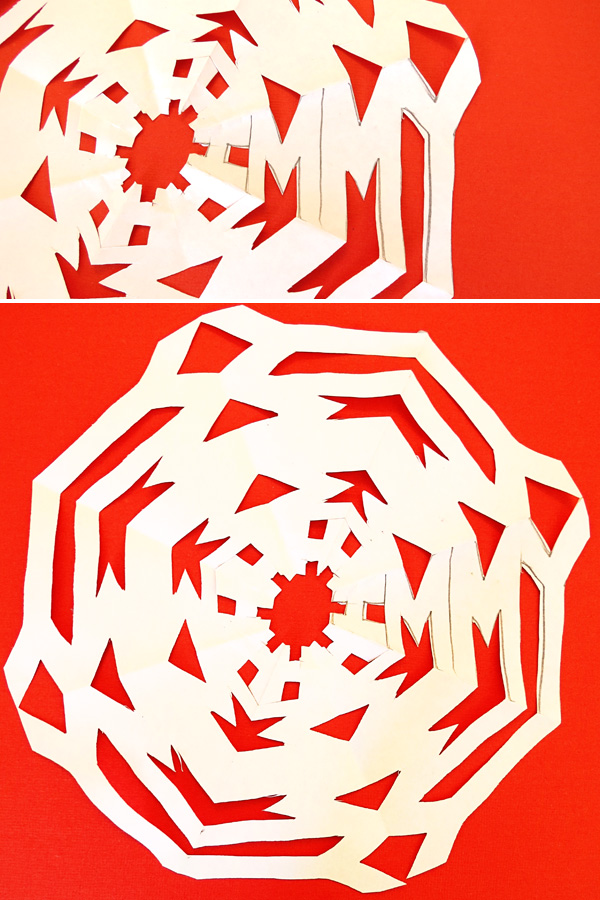
How to Make Name Snowflakes
1. Start with a round piece of paper – A4 sized works for short names but you’ll want to use a larger sheet if you’re working with children with longer names.
2. Fold the paper in half. Then you can either fold the half into thirds to make a more authentic, six sided snowflake OR (because it’s much simpler for kids) fold your half in half and then in half again. Which actually creates an eighth, right??! Well, the result is eight sided anyway!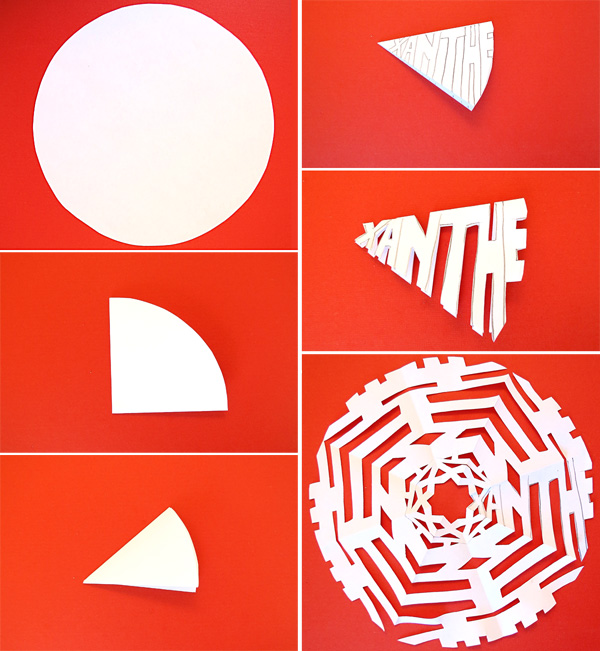 3. Use a pencil to write your name across the folded circle in block or bubble letters, making sure that the top and bottom of each letter touches the folded edges of the paper. You also want the letters to touch each other at at least one point, don’t leave a space between each one.
  4. Cut the non-letter spaces away, being careful to not cut all the way between two letters.
You may need to get creative with letters that need a hole in the middle (like d and p)! We cut neatly up, down or across into that part of the letter shape and then cut around the hole (as you can see with the letter e below).
5. Once you’re cutting is done, unfold your snowflake. Ta-da! Awesome, huh?!!
You can also make different versions of your name by experimenting with upper and lowercase letters, different styles of lettering and varying the spacing of your letters – so one name can have a myriad of unique variations! 
Have fun making snowflakes for each member of your family or comparing those made by each child in your class.
Happy snipping!
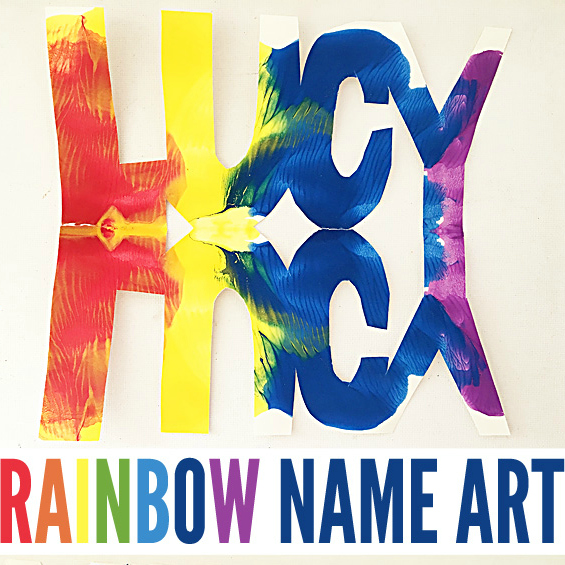
Click below to check out our other gorgeous name art idea!
Really love this project! We’ll have to try it in some of our classes. Thanks for the post! 🙂
I absolutely LOVE this idea!!!
SOOOOOO awesome.
This is an AMAZING idea! Really makes that “all snowflakes are unique” idea ring true – my kids will just adore this!
AWESOME! I had fun practicing with my name and immediately was pondering how my name would look with bubbled letters etc… What a fun way to get back into school in January. I’m going to add a writing assignment with the snowflake. I’m thinking of having the students use adjectives for each letter of their name to uniquely describe themselves. Thanks for posting this fun activity.
So simple, but so clever! I want to try it just to see what my name looks like as a snowflake!! This would be a wonderful craft to emphasise how precious and individual each child is 🙂
Oh my goodness! This is so cool!
I will have to try this one tomorrow. I bet my daughter would love cutting her name out in a snowflake.
My little brother wanted me to try this project… and it was so cool I ended up making one for each family member! I posted the results on my blog. I also posted a link to this tutorial. Thanks for the idea!
https://themightyzorvig.wordpress.com/2015/12/23/our-names-in-the-snow/
This idea rocks!!! Can’t wait to use it.
It’s a little addictive! Have fun 🙂
We did a similar activity at Halloween. Cut out the name on 1 fold, then open it, it looks like a skeleton.
https://www.flickr.com/photos/76011571@N04/15652257866/in/dateposted-public/
Oh, that is a cool idea!
That’s cute. The only change I would make is to fold it so there are six sides instead of eight. A real snowflake is hexagonal due to the arrangement of water molecules when it freezes.
Six sides would be easier to cut too — hmmm, must try at home.
Well, I just tried this with 7th and 8th graders in a math class and was amazed how they struggled with writing their names so the letters attached. I just read over your instructions to make sure I wasn’t leaving something obvious out, but, no. I think I will have to skip this next time.
Hi, just wanted to let you know I used this technique with people with mental illness yesterday as part of a Recovery Art Journaling course I facilitate. We all loved it. Only thing is here in New Zealand I could only buy cheap chalk so our colours are very muted but still very pretty.
We had cut out name snowflakes and we floated these and they looked great. https://childhood101.com/2015/11/name-snowflakes/
Also it sparked off a great discussion about how, like our name snowflakes, we are all unique and beautiful… Serendipity
https://cassiestephens.blogspot.co.nz/2014/01/in-art-room-floating-chalk-prints.html
Thanks for the idea.
I used cheap hairspray to seal them but think that it isn’t going to work very well.
What a neat activity! I like the mix of different skills and thought processes that are involved in creating this project. Plus, it adds some extra meaning to paper snowflakes. I think I’m going to try it with a 4th grade art class…wish me luck!
Good luck!