DIY Kids Car for Under $10
Nothing like a creative challenge to get my brain working and what could be more fun than following up Immy’s beloved cardboard box play kitchen with the next DIY Kids project… a car.
Same rules apply. Only $10 and whatever I can find in my recycling bin and around the house to complete the challenge. Here’s how I did…
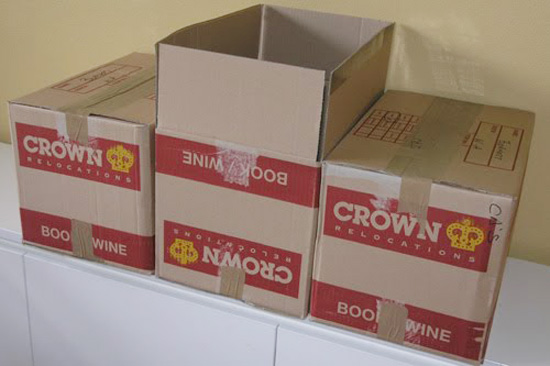
1. Find three boxes that are the same size (or at least the same width). The middle box should be large enough for your child to sit in. From left to right, tape the first box completely shut, tape the bottom only of the second box and the top only of the third. I raided the garage for three book boxes left over from our last move.
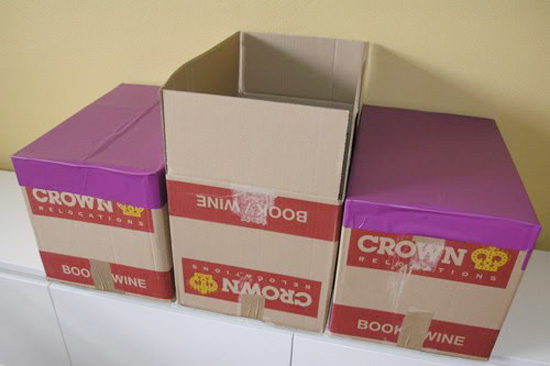
2. As for the kitchen challenge, I decided to use self adhesive book covering with the car. I think it adds some additional strength to the cardboard and is less messy than paint. I found some on special at Kmart for $1.99 per roll so I grabbed three. Cover the tops of boxes 1 and 3 with the book covering.

3. Cover each of the long sides with the book covering, this effectively tapes the three boxes together.
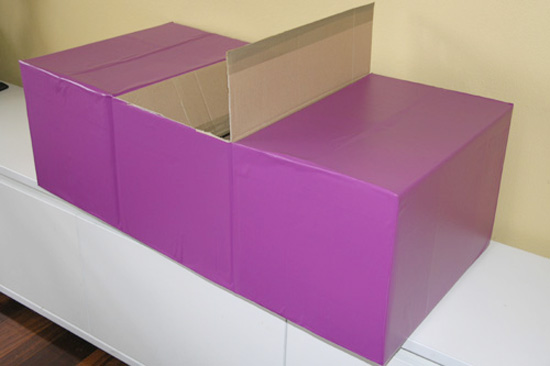
4. Cover either end of the car with book covering. Bend in or cut off the remaining box flaps to the left of the middle box. The flap remaining will become the windscreen of the car.
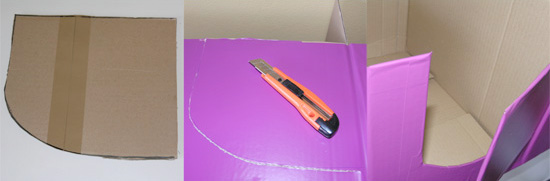
5. To make the car door: I used scrap card to make a template of a shape that I was happy with. Then I traced the shape onto the side of the middle box and cut along the marked line (leaving the one side attached as a hinge). I used strips of book covering as tape which I ran around the door and the door frame to neaten the raw edge of the cardboard. I decided to only make a door on one side to give the car greater stability.
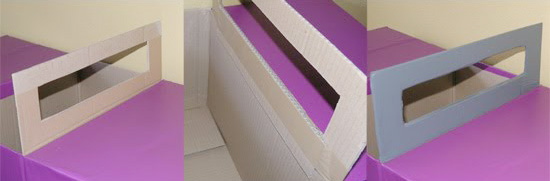
6. To make the windscreen: Mark the area to remove and cut out with a utlility blade. I then used the cut out piece to reinforce the windscreen along the fold of the box flap by taping it in place with packaging tape. Cover the windscreen with book covering for further reinforcement (I used some of the grey left over from the kitchen project).
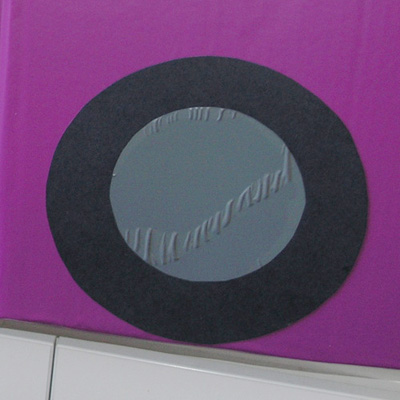
7. To make the wheels: There are many different ways that you could make wheels for your car – plastic plates, craft foam, paper, card, draw or paint them on. I chose to cut my wheels from a sheet of black A3 card. I then used some of the leftover grey book covering to make hubcaps. Trace around a plate or bowl to make your circle shape and then cut them out. I used craft glue to attach the wheels to the car.
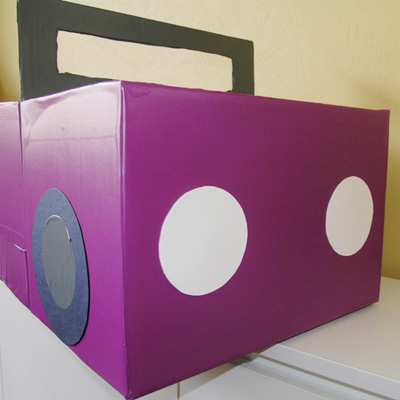
8. Headlights: Cut circles from white craft foam (or paper or card) and attach with craft glue. You may also like to make brake lights from red craft foam for the back of the car.
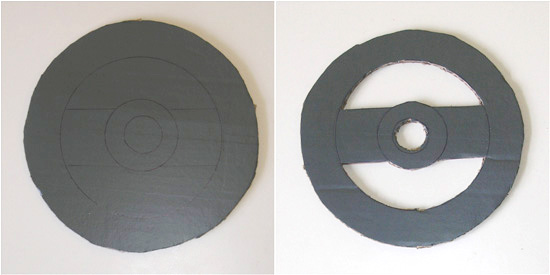
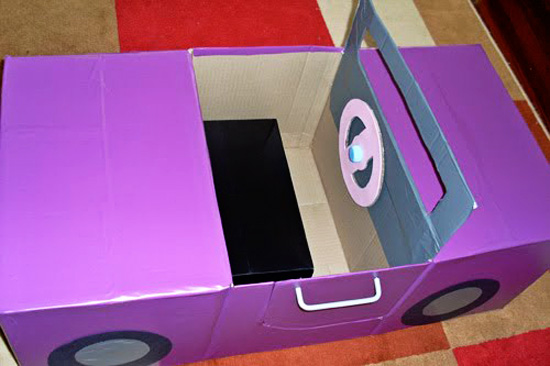
9. Making the steering wheel: I had kept the piece of cardboard that was left over when I cut out the sink space in the kitchen project and it was perfect for the steering wheel (but any scrap box card will do, just trace around a plate or bowl and cut it out with your utility knife).
I simply marked the shapes for the steering wheel by tracing around various household objects and then cut out the sections with the knife. For durability, think chunky shapes for clumsy, chubby hands and fingers! I traced around the cap from a water bottle for the centre hole and then cut it slightly smaller, you’ll see why shortly! Again, for durability (and to make it pretty), I used the cardboard shape as a template and cut the same shape from craft foam. I then glued this onto the cardboard original and the steering wheel is complete.
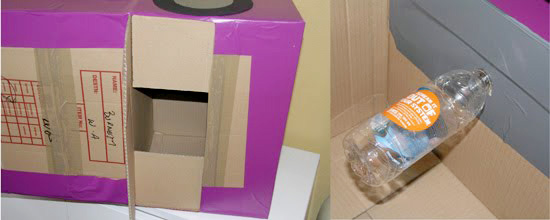
10. Attaching the steering wheel: This was the trickiest part of the challenge. On the inside of the car (think dashboard), mark where the centre of the steering wheel will need to be secured. Make a deep cut with your utility knife to mark this spot through the sides of the two adjoined boxes. Then flip the car onto its side to access the bottom of the box that was left open. Use the slit you have just made as a guide to cut a hole with your utility knife large enough to fit the neck of a water bottle through. The photo on the right shows the water bottle sticking through the dashboard (this is the WRONG side and is simply for illustrative purposes). Stick the bottle neck through the hole with the bottle inside the enclosed box. Then thread on your steering wheel and screw on the bottle top. Voila!

The water bottle acts as a bolt and will not pull through and the steering wheel even turns! A big thanks to the person who left the anonymous comment on the kitchen project with this great suggestion.

11. Just like the oven in the kitchen project, I knew the car door would need a handle. What to use has been consuming my thoughts for many days now. Luckily, the latest Ikea catalogue arrived in my letterbox and I had an Aha! moment. I decided to check if there were any reasonably priced handles in the kitchen section. You won’t believe that Ikea sells a packet of SIX silver handles (called the Kosing) for only $3.95! Oh, the projects we can make with these. I simply made holes in the door for the screws with a pen and screwed the handle into place.
12. To make a seat inside the car I filled a shoe box with some unused hardcover books from our shelf and sat it inside.
Total costs involved:
– $0.00 Three large boxes
– $5.97 Book covering
– $1.50 A3 sheet of black card for wheels
– $0.25 White craft foam for headlights
– $0.25 Pink craft foam for steering wheel
– $0.66 Door handle
– $0.00 Water bottle from our recycling box
– $0.00 Shoe box for seat (I knew it would come in handy one day!)
– $1.00 Packaging tape and craft glue (used from our craft stash)
$9.63 TOTAL
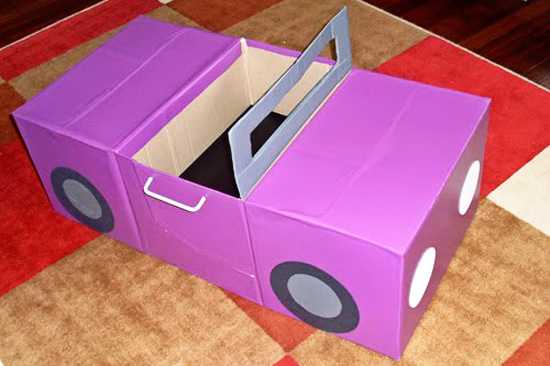
So there you have it, a DIY Kids Car for Under $10.
And now for a test drive by an impatient toddler who has been saying, “Brooooom, brooooom, car, me car,” as she waits for me to finish it off!
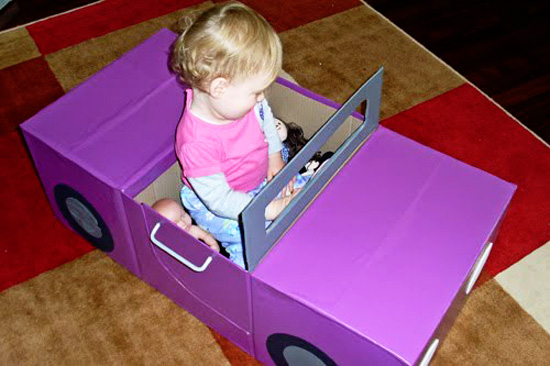
She loves it so much that I can not get her to leave it! All manner of dolls and furry animals are being ferried to the park and the shops.
Related Posts
Superb Christie! Will definitely be linking to this, what a wonderful project!
Is there anything you can't do for under $10 Chris?! This little car is fabulous. I think we'll have to start sending you challenges… 😉
OMG – This is a FABULOUS idea – my son would love to have me make him one of these. GREAT POST!!
how brilliant! and i thought they couldn't possibly have more fun than a plain cardboard box as imaginary car. but a purple box car? heaven!
super Christie …I'll need a double seater or two !
Paint would do the trick too and what fun would the kids have.I'll use gaffer tape as a stripe and to hold it all together.
I love it 🙂
AMAZING and bought a smile to Grump's face after his extra long flight last night. She is going to be a rev-head for sure!!
I recently came accross your blog and have been reading along. I thought I would leave my first comment. I dont know what to say except that I have enjoyed reading. Nice blog. I will keep visiting this blog very often.Susanhttp://carusbcharger.com
Wow, this is so cool! I remember making these as a child. Mine never looked that good though. =) I'd love to link to this if you didn't mind.
What a fantastic (not to mention cheap!) toy for a little one.
I've made cubby houses and robots from boxes before (not very good ones!) but your car is so well done!
Oooh, this one is really cool too! I found your blog b/c of the tutorial on the play kitchen.
I hope your little one realizes how lucky she is to have such a creative mom 🙂
Immy is still loving her purple-mobile! Would love to see photos if anyone else makes one.
Christie
super Buenisima Idea…. Muchas gracias.
Que tengas linda Semana.
Ara.
this is sooo cute. I want to be your child as well. could you adopt me please please please.
¡¡¡Felicitaciones!!!, ¡¡¡Creatividad pura!!!, me encantó esta auto, creo que se lo voy a hacer a mis mellizos, es que me gustó demasiado, está precioso y muy práctico.
Love the car! My son 'needs' a steering wheel that turns, I cannot think how to do it – any ideas?
my daughter will LOVE this thanks so much!
http://www.sandandstarfish.com
I love your cardboard creations. Instead of books for the seat do you have old telephone directories. They are thick, strong and recycled at the end of each year in Australia. They are huge and covered in fabric can be used for just about anything, steps, stools, seats, etc. Just whip off the cover and wash it then replace. Easy! If the book gets wet, or damaged then replace with a new, old one. The ultimate in recycling!!!
What a great idea.
I know this is a rather old post, but I just came across it and thought it would be great to use one of those IKEA handles as a towel bar for the play kitchen. 🙂 I’ve been tossing around ideas for what to use to make a play kitchen for my two and I think I finally found it. I think I’ll also cut a cupboard door on the other side to hold their dishes and play food and maybe make a little hutch out of a box lid to hang a towel bar and a few hooks for utensils if it holds up. I’ll be sure to post if I get it all done!
I’m in charge of making an safaris jeep for our summer school camp. How can I take your idea one step further so they can ride in it?
veeeeeeeeeery gooood.