Making our Wooden Sandpit
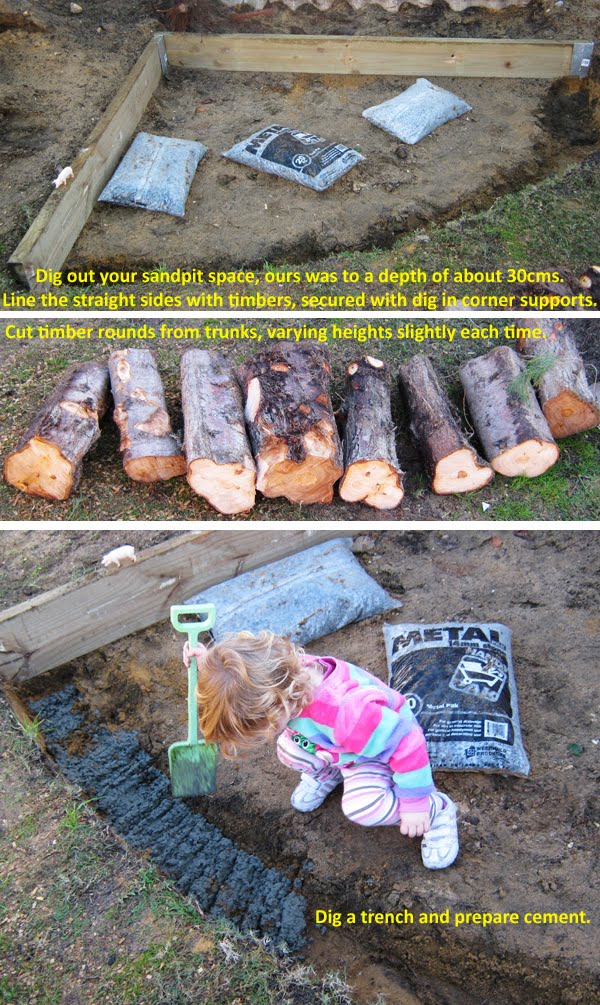
 You might remember in this recent post about Treasure Hunt Soup, how Immy enjoyed the climbing challenge of the trunks of the trees we were pulling down (so we can replace a row of some awful pine/conifer variety with some more useful fruit trees). When I saw how much she enjoyed them, I was determined to use the trunks in our yard somehow but I wasn’t sure exactly how. Then we started making plans for building a sandpit and it all started to fall into place. So here is how we made our wooden sandpit…
 Fill with sand and dig away…
 … and when you are finished digging, there is plenty of stump balancing to be enjoyed 🙂
We still have a lot of work to do in the backyard and in an effort to keep the sandpit sand somewhat clean and separate from the soil all around, we have lined the sides of the sandpit temporarily with some fake turf and this weekend we will be planting a small hedge along the fence side. Immy loves outdoor play and the sandpit is already a big hit. I must admit, I don’t get the problem with sand, it brushes off easily, is easy to sweep up and kids love it, which for me equals a moment’s peace, and what is not to love about that?
Related Posts
I love this post! Coincidentally, I was just thinking of creating a sandpit for my boy at the new house that we will be moving into. Was just telling my husband last night about my idea only to have him grumble about how difficult and troublesome that would be. i'm gonna get him to read this tonight!
Christie, your sandpit looks amazing! I love the way you've used the logs at the front. Have fun Immy!
Awesome! That turned out great. My husband wanted to make a sandbox for our son but didnt know how-I will show this to him.Thanks!
This looks amazing! I love how you said at the end that the time they spend in the sand (box for me) – is time you get to kinda relax for a minute because they are occupied. My boys LOVE to play in the sandbox. And I love it to – because I can actually sit back and enjoy watching them play together! Great post! Thanks for sharing!
Aaahh. Love, love, love. I hope your simple instructions inspire others to put sandpits in their yards too!
I love the sandpit, especially the lovely logs that feature across the front and provide a fun stepping-stone game for Immy. A great post!
This is such a lovely sandpit…i really like the log look. Thank you for your sandpit inspiration.
That's such a fabulous sandpit! Last week I picked up some sand to refill one of our clam shells that had been empty for ages. Will has been out on the deck playing with sand constantly! Your post has inspired me to make a 'proper' sandpit though!
That's one of the best sandpits I've seen – I love the use of logs around the curved edge. Great easy to follow instructions too.
Hi there! We are hoping to move to a new house with a bigger garden soon and I am keeping this post to make a sandpit just like this one for my two little ones! I just want to ask if you have any suggestions for keeping neighbour cats out? That is a HUGE problem for us right now. In lieu of a sandpit I filled several large, low garden pots with soil for my children to dig in, but all the cats in the neighbourhood seem to think it is there for them to use as ablution facility!
There are only 2 minor problems with sandpits.
1. Finding "play sand" that does not contain silica (a known carcinogen). The fine print reads "Prolonged exposure to silica dust has been known to cause cancer, birth defects and reproductive harm". All the "play sand" we found at Home Depot et al, contained silica.
I have found only ONE safe sand (Sandtastic) and had to special order it.
http://motherrising.blogspot.com/2007/03/whats-in-your-sandbox.html
2. The other safety issue, is that it must be covered when not played with so that animal feces don't end up in the sand. Animal feces can transmit parasites such as Toxoplasma Gondii, Salmonella, E. coli and Campylobacter.
*As for pesky insects (like sand fleas), a few drops of peppermint oil will send them packing and leave your little one's tootsies smelling like candy canes 🙂
Thank you so much for posting this step-by-step guide (and also a link to my post!). It's a great example of how to do it. So I've edited my blog to ensure a link back as I think many others will be interested.
I'm also intrigued and grateful to Wendy for flagging up the silica dust concern – that's a new hazard for me and one that I haven't seen arise as an issue in the UK yet.
If it's any reassurance to other readers, the concern here is the ingestion of silica dust into lungs during industrial activities such as sandblasting which is a very dusty activity requiring protective clothing.
Sandtastic states that it doesn't contain any "free" silica rather than it being silica free (NB silica and quartz are the main components of most sand types).
It's great that this product exists for those who need this reassurance. I do find the silver play sand in most UK shops dust free and fine for general use. Sandtastic is not available in the UK.
Peppermint oil sounds fab…I get bored of citronella and tea tree so thanks too for flagging this up.
What a beautiful sandbox! Immy is a lucky girl, and you are very creative. I love the way natural materials look in projects like that…such a good use of things you already have around, too!
Thank you everyone for your lovely comments.
For those with questions about keeping animals out, we will use a shadecloth cover, which is exactly what we used in my child care centre as well. If you want to easily weight it down, sew a few channels around the edges to accommodate some lengths of metal chain. Just enough weight to hold it in place but not to cumbersome to move easily.
Wendy and Julia, thank you for the information about silica, like you Julia, it is not something which I have come across as an issue in Australia and we have sandpits all around this country.
Oh, and for those of you who want to add sandpits to your yard, this process really wasn't hard at all and Dad 101 isn't really the handyman type – so if he can do it, I am sure you can too 🙂
I bet Immy is pretty darn impressed with her new sandpit! I especially love the way you have used the stumps.
great sandpit, cant wait to come and try it out 😀
Very cool sand pit. Very creative in design and use of materials.
Blessings
Diane
That is beautiful 'hand made' sandpit,Lucky girl
How long did the logs hold up without having them de-barked?
I love this idea I was wondering if you had to replace sand at all from mold?
Our sand has been fine, Amity, though we do top it up regularly and rake it over.
I love this look – how have the logs held up over the past 5+ years?