Homemade Mulberry Playdough Recipe
Inside: This spectacular homemade mulberry playdough uses DIY mulberry dye made from damaged or inedible berries.
We have a huge mulberry tree in our front garden that is just coming into season. Our children eat mulberries by the bowl full and we all really love this time of year. Unfortunately, late last week we were hit by quite a big storm and I was devastated to find so many of our precious berries lying damaged on the ground. I was determined not to let them go to waste and immediately started researching ways of making natural dye from berries so that we could have a go at making our own dye to use in art projects.

Making Natural Mulberry Dye
The process of making mulberry dye was super simple and the results were excellent. Here’s how to make your own mulberry dye;
1. Gather your berries. We collected enough to half fill a large pot.
2. Add water. As I was hoping for the strongest colour possible, I only added enough water to just cover the berries.

3. Simmer. I simmered the berries over a low heat for an hour and a half.

4. Strain. We strained the liquid through a metal sieve three times, until I was satisfied that the liquid was clear enough for our purpose. I did however read that straining the dye further through a piece of muslin will help to ensure that all of the berry pulp has been removed.
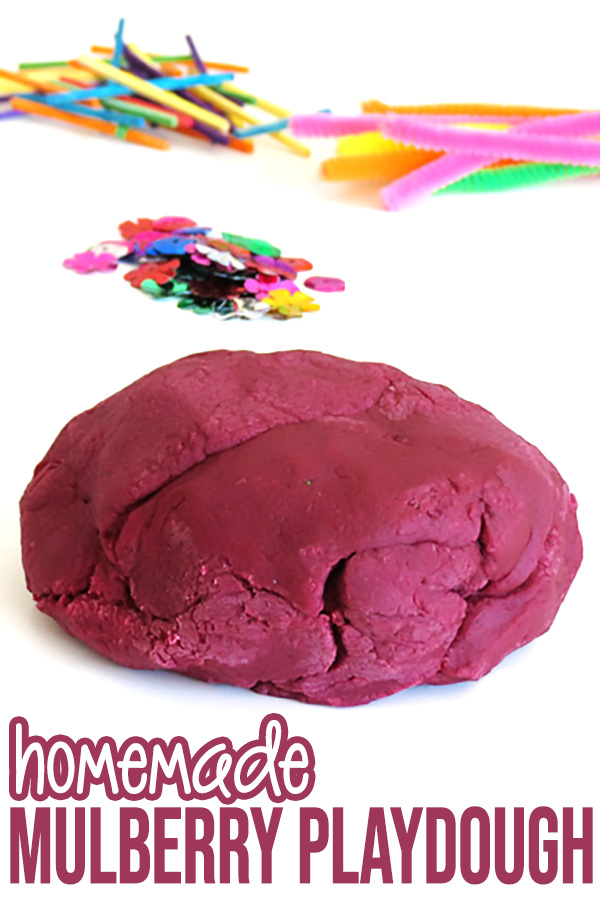
We ended up with about 4 cups of lovely, rich maroon dye. And the very first use for our mulberry dye was making a batch of homemade mulberry playdough!

Homemade Mulberry Playdough
I simply adapted the simple, cooked playdough recipe that I have always used at home and kindergarten, switching out the 2 cups of water from the original recipe for 1 1/2 cups of the mulberry dye and 1/2 a cup of water. You can see (and print) the step-by-step mulberry playdough recipe below.
I could probably have just used 1 cup of dye and 1 cup of water but was aiming for an intense maroon color.
Once cooked, the mulberry dye did not stain hands or our laminate tabletop. I would however suggest using a plastic placemat if working directly onto a wooden surface.

To play, I added fairy stones, googly eyes, colored matchsticks, pipe cleaners and sparkles to create a fabulously fun invitation to play.

Mulberry Playdough Recipe
A wonderfully rich homemade playdough for sensory play using DIY mulberry dye.
Materials
- 2 cups of plain flour
- 1 cup of salt
- 2 tablespoons of cream of tartar
- 2 tablespoons of vegetable oil
- 1 1/2 cups of homemade mulberry dye
- 1/2 cup of water
Tools
- Measuring cups
- Measuring spoons
- Large saucepan
- Wooden spoon
- Chopping board
Instructions
- Place all ingredients into a large saucepan.
- Stir over a medium heat until the mixture congeals and forms a ball, for approximately 3-5 minutes. Continue to turn the dough over for another minute once the ball has formed.
- Remove from the heat and knead until the dough is smooth.
Notes
- Once cooked, the mulberry dye did not stain our hands or laminate tabletop. I would however suggest using a plastic placemat if working directly onto a wooden surface.
- Homemade playdough is best stored wrapped securely in an airtight plastic bag in a cool, dry place.
For more playdough recipes for sensory play, check out these related posts;


that’s a lovely colour and looks good enough to eat actually ;p
Ai @ Sakura Haruka
I love using onion skins for making homemade dye. They create a nice soothing yellow that you can use for tons of fun stuff. I love your post – and the idea of using berries to create naturally colored dough!
🙂
Just wondering, does it stain your hands when working the dough?
This looks gorgeous. Fab colour.
Hi Christie
I just read this post about your mulberries and was wondering if I might be able to come and get some leaves off your tree. We are keeping silkworms at our place at the moment and I’m always on the lookout for supplies of leaves. You are welcome to have some of our silkworms if you are interested. We got them from my daughter’s daycare and we have around 40. They are nearing the end of their cycle though, so you may want to just take some eggs and keep them for next year. Hope you and Immy are enjoying the school hols so far. 🙂 Jenny (Daniel’s mum)